Introduction to Word Processing
3 views
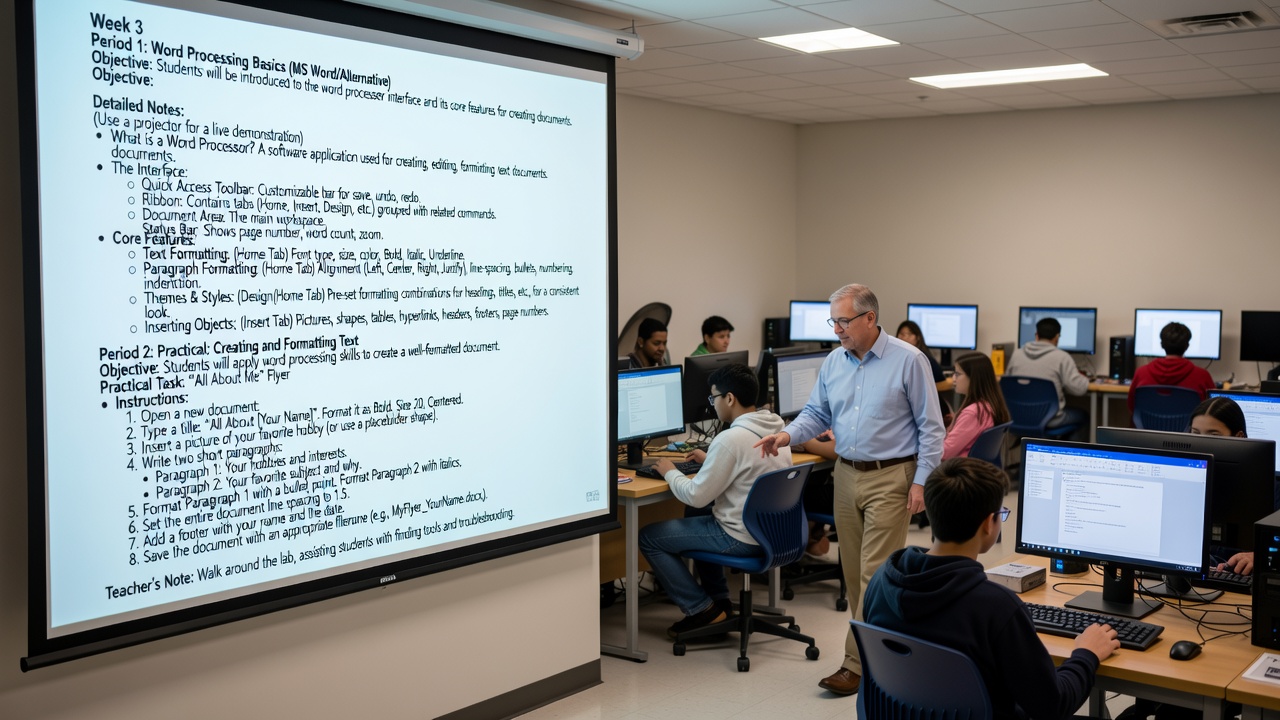
Week 3: Introduction to Word Processing
Period 1: Word Processing Fundamentals (MS Word / Google Docs / Alternatives)
Objective: Students will be introduced to the word processing interface, learning to navigate the layout and identify core features used for document creation and formatting.
Detailed Notes & Demonstration Guide
Instructor Note: Use a projector/screen-share for a live, interactive demonstration. Pause frequently to let students locate tools on their own screens.
What is a Word Processor?
Software designed to create, edit, format, save, and print text-based documents.
- Modern Context: Briefly highlight the benefits of cloud-based processors (like Google Docs), such as auto-saving and real-time collaboration.
Navigating the Interface
- Menu/Toolbar & Ribbon: The main command center containing tabs (e.g., Home, Insert, Layout) grouped by related tasks.
- Quick Access / Top Toolbar: A customizable shortcut bar for frequent actions like Save, Undo, and Redo.
- Document Workspace: The main digital "paper" area where typing and editing occur.
- Status Bar: Located at the bottom; displays real-time data like page number, word count, language, and the zoom slider.
Core Formatting Features
- Text Formatting (Home/Format Tab): Changing font family, size, and color. Applying emphasis: Bold, Italic, and Underline.
- Paragraph Formatting (Home/Format Tab): Text alignment (Left, Center, Right, Justify), adjusting line spacing, creating bulleted/numbered lists, and modifying indentation.
- Styles & Themes (Home/Design Tab): Utilizing pre-set formatting combinations for headings and titles to ensure a professional, consistent document look.
- Inserting Elements (Insert Tab): Embedding non-text objects such as images, shapes, tables, hyperlinks, headers, footers, and page numbers.
Period 2: Hands-On Practice: Creating and Formatting a Document
Objective: Students will apply foundational word processing skills to design, format, and save a personalized digital flyer.
Practical Task: "All About Me" Digital Flyer
Step-by-Step Instructions
- Initialize: Open your word processor and create a new Blank Document.
- Title Formatting: Type the title: "All About [Your Name]". Format it to be Bold, Size 20, and Center Aligned.
- Insert Visuals: Insert an image representing your favorite hobby. (Instructor note: If offline or lacking image access, instruct students to insert and format a Shape instead). Resize and center the image.
-
Draft Content: Write two short paragraphs below the image:
- Paragraph 1: Describe your hobbies and interests.
- Paragraph 2: Describe your favorite school subject and explain why you like it.
- List Formatting: Convert the text in Paragraph 1 into a bulleted list.
- Text Styling: Apply Italics to the entirety of Paragraph 2.
- Spacing: Adjust the line spacing for the entire document to 1.5.
- Page Elements: Insert a Footer that includes your full name and today's date.
- Save/Share: Save the document using a clear naming convention (e.g.,
Week3_Flyer_FirstName_LastName.docx). If using Google Docs, rename the file accordingly and ensure it is shared with the teacher.
Teacher's Facilitation & Assessment Notes
- Circulate & Support: Walk around the lab to assist students with tool navigation, mouse/trackpad skills, and troubleshooting.
- Check for Understanding: Instead of just fixing errors for students, ask guiding questions (e.g., "Which tab do you think holds the tool for changing line spacing?").
- Pacing: Keep an eye on the clock. Give a 5-minute warning to ensure all students have time to complete the footer and properly save/share their files before the bell rings.
Test yourself on Digital Technology
Introduction to Sequencing, Loops, and Simple Animation in Scratch
134 questions
10 min
SSS1
Start quiz
Track your reading & take quizzes
Create free account