Power Supply Unit and Cabling Standards
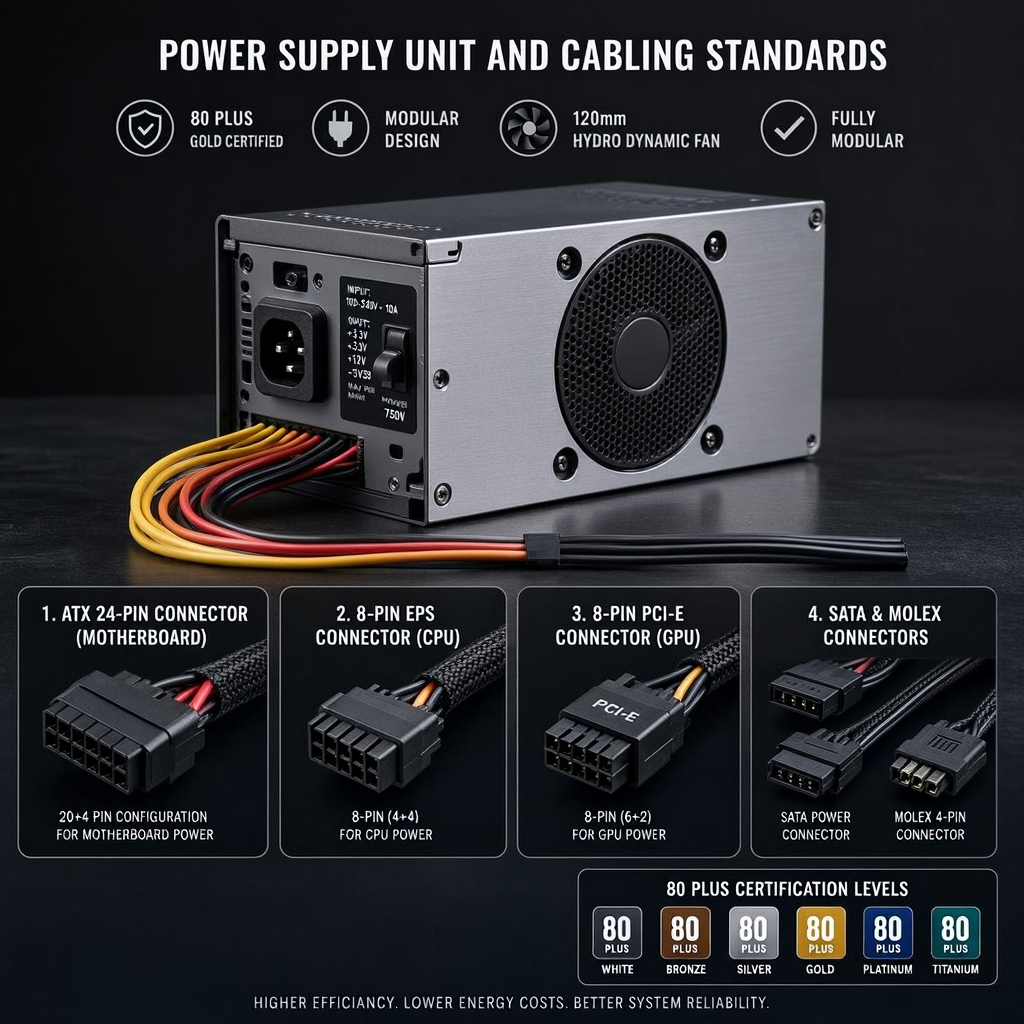
Week 6: Power Supply Unit (PSU) and Cabling Standards
🔌 1. Power Supply Unit (PSU): The Heart of Your System
The Power Supply Unit (PSU) is one of the most critical yet underappreciated components in a computer. It acts as the electrical backbone, converting and distributing power to every part of your system. A poor-quality PSU can lead to instability, hardware damage, or even fire hazards, while a high-quality unit ensures reliability, efficiency, and longevity.
🔹 Core Function: AC to DC Conversion
The primary role of a PSU is to convert Alternating Current (AC) from your wall outlet into Direct Current (DC) that your computer components can use.
| Input (AC) | Output (DC) | Purpose |
|---|---|---|
| 110–120V (North America, Japan) |
+3.3V | Powers motherboard, RAM, and some storage |
| 220–240V (Europe, Asia, etc.) |
+5V | Powers motherboard, SSDs, HDDs, USB ports |
| +12V | Powers CPU, GPU, fans, and high-power components | |
| -12V | Legacy support (rarely used in modern systems) | |
| +5VSB (Standby) | Powers components in sleep mode (e.g., Wake-on-LAN) |
💡 Did You Know?
Modern PSUs use switching power supply technology, which is more efficient than older linear PSUs. This allows them to handle a wide range of input voltages (100–240V) automatically.
⚡ Wattage: How Much Power Do You Need?
The wattage rating of a PSU indicates the maximum continuous power it can supply to all components. Choosing the right wattage is crucial—too little, and your system may crash or fail to start; too much, and you waste money and efficiency.
📊 Estimating Your Power Needs
Use this general guideline for different system types:
| System Type | Estimated Power Draw | Recommended PSU Wattage | Example Build |
|---|---|---|---|
| Office/Basic PC | 150–250W | 400–500W | Intel i3, Integrated Graphics, 1 SSD |
| Budget Gaming PC | 300–400W | 550–650W | Ryzen 5, GTX 1660, 16GB RAM |
| Mid-Range Gaming PC | 450–600W | 650–750W | Intel i7, RTX 3070, 32GB RAM, 2 Storage Drives |
| High-End Gaming PC | 600–800W | 850–1000W | Intel i9, RTX 4080, 32GB RAM, Multiple Drives, RGB Fans |
| Extreme Workstation | 800–1200W | 1000W–1200W+ | Threadripper, Dual RTX 4090, 128GB RAM, 10+ Drives |
⚠️ Pro Tip:
Always add 20–30% headroom to your estimated power draw to account for:
- Peak power spikes (GPUs can draw 2–3x their rated TDP during load)
- Future upgrades (adding a new GPU, more drives, etc.)
- Efficiency losses (no PSU is 100% efficient)
🔍 How to Calculate Your Exact Power Needs
- Use a PSU Calculator:
- Manual Calculation:
- Check the TDP (Thermal Design Power) of your CPU and GPU.
- Add ~50W for motherboard, ~10W per RAM stick, ~5–10W per storage drive, and ~3–5W per fan.
- Multiply GPU TDP by 1.5 (GPUs often draw more than their rated TDP under load).
⚠️ Warning:
Never cheap out on a PSU! A low-quality unit can fry your components or even start a fire. Stick to reputable brands (Corsair, EVGA, Seasonic, be quiet!, Thermaltake, etc.).
🏆 Efficiency Ratings: 80 PLUS Certification
Not all PSUs are created equal—efficiency determines how much of the input power is actually converted into usable DC power (vs. wasted as heat). The 80 PLUS certification is the industry standard for measuring PSU efficiency.
| Certification | 115V Efficiency (20%/50%/100% Load) | 230V Efficiency (20%/50%/100% Load) | Typical Use Case | Heat Output |
|---|---|---|---|---|
| 80 PLUS (White) | 80% / 70% / 60% | 80% / 75% / 70% | Budget builds | High |
| 80 PLUS Bronze | 82% / 81% / 75% | 85% / 82% / 78% | Mainstream gaming | Moderate |
| 80 PLUS Silver | 85% / 82% / 78% | 88% / 85% / 82% | Mid-range systems | Low |
| 80 PLUS Gold | 87% / 88% / 85% | 90% / 88% / 87% | High-end gaming | Very Low |
| 80 PLUS Platinum | 90% / 89% / 87% | 92% / 90% / 89% | Enthusiast builds | Minimal |
| 80 PLUS Titanium | 90% / 92% / 94% | 91% / 94% / 96% | Premium workstations | Almost None |
💰 Why Efficiency Matters
- Lower Electricity Bills: A Gold-rated 750W PSU wastes ~10% less power than a Bronze-rated one, saving you money over time.
- Less Heat = Longer Lifespan: More efficient PSUs run cooler, reducing wear and tear.
- Quieter Operation: Less heat means the fan doesn't have to work as hard.
- Environmental Impact: Higher efficiency = less wasted energy = smaller carbon footprint.
💡 Example:
A 750W 80 PLUS Gold PSU running at 50% load (375W) will waste ~44W as heat, while a 750W 80 PLUS Bronze PSU will waste ~70W—that's 60% more heat!
📐 PSU Form Factors: Choosing the Right Size
PSUs come in different physical sizes (form factors) to fit various case types. Here are the most common:
| Form Factor | Dimensions (W x H x D) | Typical Use Case | Max Wattage | Notes |
|---|---|---|---|---|
| ATX (Standard) | 150mm x 86mm x 140–200mm | Most desktop PCs | 400W–1600W | Most common; fits in mid-tower and full-tower cases |
| SFX (Small Form Factor) | 100mm x 63.5mm x 100–130mm | Mini-ITX builds | 300W–800W | Compact; often used in small cases |
| SFX-L | 130mm x 63.5mm x 100–130mm | Small but powerful builds | 500W–1000W | Longer than SFX for higher wattage |
| TFX (Thin Form Factor) | 85mm x 64mm x 175mm | Slim desktop cases | 300W–500W | Used in prebuilt slim PCs |
| FlexATX | 81.5mm x 40.5mm x 150mm | Ultra-compact systems | 200W–400W | Rare; for very small cases |
🔌 PSU Cable Management Types
The way cables are connected to your PSU affects airflow, aesthetics, and ease of installation.
| Type | Description | Pros | Cons | Best For |
|---|---|---|---|---|
| Non-Modular | All cables are permanently attached to the PSU | Cheaper, no loose cables | Messy cable management, poor airflow | Budget builds |
| Semi-Modular | Essential cables (24-pin, CPU) are fixed; others are detachable | Balance of cost and flexibility | Some fixed cables may still clutter | Mid-range builds |
| Fully Modular | All cables can be detached | Cleanest cable management, best airflow | More expensive | High-end builds, custom PCs |
💡 Pro Tip:
If you're building a high-end PC with RGB lighting, a fully modular PSU is worth the extra cost for clean cable management and better airflow.
🛡️ PSU Protection Features
A high-quality PSU includes multiple safety mechanisms to protect your system from electrical issues:
| Protection | Full Name | What It Does | Why It Matters |
|---|---|---|---|
| OVP | Over Voltage Protection | Shuts down if voltage exceeds safe levels | Prevents damage from power surges |
| UVP | Under Voltage Protection | Shuts down if voltage drops too low | Prevents instability from low power |
| OCP | Over Current Protection | Limits current to safe levels | Prevents overheating and fires |
| OPP | Over Power Protection | Shuts down if total power draw exceeds PSU capacity | Prevents PSU overload |
| SCP | Short Circuit Protection | Cuts power if a short circuit is detected | Prevents electrical fires |
| OTP | Over Temperature Protection | Shuts down if PSU overheats | Prevents thermal damage |
| NLO | No Load Operation | Allows PSU to run without a load | Prevents damage when no components are connected |
⚠️ Warning:
Never use a PSU without these protections! Cheap, no-name PSUs often lack these features and can damage your components or start a fire.
🔥 Additional PSU Features to Consider
| Feature | Description | Benefit |
|---|---|---|
| Fluid Dynamic Bearing (FDB) Fans | Uses liquid lubricant for smoother fan operation | Longer lifespan, quieter operation |
| Zero RPM Mode | Fan stops spinning when PSU is under light load | Silent operation for office/light use |
| Digital Power Monitoring | Software to monitor power draw, voltage, and temperature | Helps with troubleshooting and optimization |
| Single vs. Multi-Rail +12V | Single rail provides all +12V power from one source; multi-rail splits it | Single rail is better for high-end GPUs |
| Japanese Capacitors | High-quality capacitors from brands like Nichicon, Panasonic | Better reliability and longevity |
| Longer Warranty (7–10 Years) | Indicates manufacturer confidence in quality | Peace of mind for long-term use |
🔌 2. Power Cables & Connectors: The Lifelines of Your PC
Every component in your PC needs power, and each type of device uses a specific connector. Understanding these connectors is essential for proper installation, troubleshooting, and upgrades.
🖥️ Motherboard Power Connectors
1. 24-pin ATX Connector (Primary Motherboard Power)
- Purpose: Supplies power to the motherboard, RAM, chipset, and some storage devices.
- Voltages: +3.3V, +5V, +12V, -12V, +5VSB (Standby)
- Pinout:
- 24 pins (older motherboards may use 20-pin ATX12V 1.x)
- Color Coding:
- Orange: +3.3V
- Red: +5V
- Yellow: +12V
- Blue: -12V
- Purple: +5VSB (Standby)
- Green: PS_ON# (Power-on signal)
- Gray: PWR_OK (Power Good signal)
- Black: Ground (GND)
- Power Delivery: Typically 300–400W (varies by motherboard)
⚠️ Warning:
Never force a 24-pin connector into a 20-pin motherboard! Some PSUs have a detachable 4-pin section for compatibility.
2. 4/8-pin EPS12V Connector (CPU Power)
- Purpose: Provides dedicated +12V power to the CPU.
- Voltages: +12V only (all power pins are +12V)
- Variants:
- 4-pin EPS: Up to ~150W (older systems)
- 8-pin EPS (4+4): Up to ~300W (most modern systems)
- Dual 8-pin: Up to ~500W (high-end CPUs like Intel i9-13900K, AMD Ryzen 9 7950X)
- Pinout:
- Yellow: +12V
- Black: Ground (GND)
💡 Pro Tip:
If your motherboard has two 8-pin CPU power connectors, but your PSU only has one, use a CPU power splitter cable (but ensure your PSU can handle the load).
💾 Storage & Peripheral Connectors
3. SATA Power Connector
- Purpose: Powers SATA HDDs, SSDs, and optical drives.
- Voltages: +3.3V, +5V, +12V
- Pinout: 15 pins (though only 4 are typically used for power):
- Red: +5V
- Yellow: +12V
- Orange: +3.3V
- Black: Ground (GND)
- Power Delivery:
- +12V: Up to 4.5A (54W)
- +5V: Up to 3A (15W)
- +3.3V: Up to 3A (9.9W)
- Note: Most PSUs provide SATA power cables with 2–4 connectors (daisy-chained).
⚠️ Warning:
Do not use Molex-to-SATA adapters for high-power devices! Some adapters provide +12V and +5V from the same Molex connector, which can overload the +5V rail and cause damage.
4. Molex Connector (4-pin Peripheral)
- Purpose: Older standard for powering case fans, water pumps, and legacy devices.
- Voltages:
- Yellow: +12V
- Red: +5V
- Black (x2): Ground (GND)
- Power Delivery:
- +12V: Up to 11A (132W)
- +5V: Up to 11A (55W)
- Note: Being phased out in favor of SATA and direct motherboard connections (for fans).
💡 Did You Know?
Some RGB lighting controllers and fan hubs still use Molex connectors for power.
🎮 Graphics Card (GPU) Connectors
5. 6/8-pin PCIe Connector
- Purpose: Provides additional +12V power to high-end graphics cards.
- Voltages: +12V only (all power pins)
- Variants:
- 6-pin PCIe: Up to 75W (in addition to the 75W from the PCIe slot)
- Total for GPU: 150W (75W + 75W)
- 8-pin PCIe (6+2): Up to 150W
- Total for GPU: 225W (75W + 150W)
- Dual 8-pin: 300W (75W + 150W + 150W)
- Triple 8-pin: 450W (used in extreme GPUs like RTX 4090)
- 6-pin PCIe: Up to 75W (in addition to the 75W from the PCIe slot)
- Pinout:
- Yellow (x3 in 6-pin, x4 in 8-pin): +12V
- Black (x3 in 6-pin, x4 in 8-pin): Ground (GND)
- The additional 2 pins in 8-pin are also +12V and GND
⚠️ Critical Warning:
Never daisy-chain PCIe connectors for high-power GPUs!
- Example: If your RTX 4080 requires 2x 8-pin connectors, do not use a single PCIe cable with two 8-pin ends (unless it's a single 12V rail PSU with sufficient wattage).
- Always use separate cables from the PSU to avoid overloading a single cable.
6. 12VHPWR Connector (Next-Gen GPU Power)
- Purpose: Designed for next-generation GPUs (NVIDIA RTX 40 series, AMD RDNA 3, etc.).
- Power Delivery: Up to 600W through a single connector (replaces multiple 8-pin PCIe connectors).
- Design:
- 16-pin connector (12x +12V, 4x GND)
- Smaller and more efficient than traditional PCIe connectors
- Adapters:
- Many PSUs require adapters (4x 8-pin PCIe to 12VHPWR).
- Some newer PSUs (ATX 3.0) include native 12VHPWR connectors.
- Note: Addresses the power limitations of traditional PCIe connectors (which max out at 150W per 8-pin).
⚠️ Important:
The RTX 4090's 12VHPWR adapter issues (melting connectors) were caused by improper insertion or low-quality adapters. Always ensure the connector is fully seated and use high-quality cables.
🎨 Other Connectors
7. Floppy Disk Drive (FDD) Connector
- Purpose: Legacy connector for floppy disk drives (rarely used today).
- Voltages: +5V, +12V
- Pinout: 4 pins (2x +5V, 2x GND, +12V on some variants)
- Note: Often used with adapters for RGB lighting or small fans.
8. ATX12VO Connector (Emerging Standard)
- Purpose: New standard that delivers only +12V to the motherboard.
- Benefits:
- Simplifies PSU design
- Improves efficiency (DC-DC conversion happens on the motherboard)
- Adoption: Still gaining traction; requires ATX12VO-compatible motherboard and PSU.
🎨 Cable Color Coding Standards
While not strictly standardized, most PSU cables follow this color scheme:
| Color | Voltage | Typical Use |
|---|---|---|
| Black | Ground (GND) | Common return path |
| Red | +5V | Motherboard, SSDs, USB |
| Yellow | +12V | CPU, GPU, Fans |
| Orange | +3.3V | Motherboard, RAM |
| Blue | -12V | Legacy support |
| Purple | +5VSB (Standby) | Powers components in sleep mode |
| Green | PS_ON# | Power-on signal (connect to GND to turn on PSU) |
| Gray | PWR_OK | Power Good signal (indicates stable power) |
| White | -5V | Rarely used in modern systems |
🛠️ Cable Management Tips for a Clean Build
✅ Best Practices for Cable Management
- Use Modular or Semi-Modular PSUs
- Fully modular PSUs allow you to only use the cables you need, reducing clutter.
- Semi-modular PSUs have fixed essential cables (24-pin, CPU) but detachable others.
- Route Cables Behind the Motherboard Tray
- Most modern cases have cutouts and channels for routing cables out of sight.
- Use zip ties or Velcro straps to bundle cables together.
- Avoid Blocking Airflow
- Never place cables in front of case fans (intake or exhaust).
- Keep cables away from the CPU cooler and GPU.
- Use Cable Combs (for Custom Sleeved Cables)
- Cable combs help organize individually sleeved cables for a premium look.
- Plan Your Layout Before Installing
- Measure cable lengths before connecting.
- Route SATA and PCIe cables along the edges of the case.
- Use Right-Angle Connectors (If Available)
- Some modular PSUs offer right-angle connectors for a cleaner look.
- Label Your Cables (For Future Upgrades)
- Use small labels or colored tape to identify cables (e.g., "GPU," "SSD," "CPU").
💡 Pro Tip:
If your case has poor cable management, consider aftermarket cable management accessories like:
- Cable sleeves (for a custom look)
- Cable clips (to secure cables to the case)
- PSU shrouds (to hide cables in the bottom of the case)
⚡ Safety Considerations When Working with PSUs
✅ Do's:
- Use a Surge Protector – Protects against power surges that can damage your PSU and components.
- Check All Connections – Ensure all connectors are fully seated (you should hear a click when inserting).
- Use High-Quality Cables – If using modular PSUs, only use cables from the same manufacturer (mixing cables can cause fires).
- Ensure Proper Ventilation – Keep the PSU fan unobstructed (place the PSU with the fan facing down if the case has a vent).
- Test Before Final Installation – Use a PSU tester or paperclip test to verify the PSU works before connecting it to the motherboard.
❌ Don'ts:
- Never Mix PSUs – Do not connect two PSUs to the same system without proper synchronization (can cause short circuits).
- Avoid Daisy-Chaining PCIe Connectors – For high-power GPUs, use separate cables from the PSU (not a single cable with multiple ends).
- Don't Force Connectors – If a connector doesn't fit, don't force it (you might damage the pins or motherboard).
- Don't Run the PSU Without a Load – Some PSUs require a minimum load to operate safely (use a dummy load if testing).
- Don't Cover the PSU – Never place the PSU in a sealed compartment without airflow.
⚠️ Warning:
Never open a PSU! Even when unplugged, capacitors can hold a lethal charge for days. If your PSU is faulty, replace it—don't attempt to repair it.
🔍 Practical Example: Building a High-End Gaming PC
Let's say you're building a high-end gaming PC with the following components:
| Component | Model | Power Draw |
|---|---|---|
| CPU | Intel Core i9-13900K | 125W (TDP), up to 250W under load |
| GPU | NVIDIA RTX 4080 | 320W (TDP), up to 400W under load |
| Motherboard | ASUS ROG Strix Z790-E | ~50W |
| RAM | 32GB DDR5 (2x16GB) | ~10W |
| Storage | 1TB NVMe SSD + 2TB HDD | ~15W |
| Cooling | AIO Liquid Cooler + 5 Case Fans | ~30W |
| RGB Lighting | 3 RGB Strips + Fan Hub | ~20W |
📊 Step 1: Calculate Total Power Draw
- CPU: 250W
- GPU: 400W
- Motherboard: 50W
- RAM: 10W
- Storage: 15W
- Cooling & Fans: 30W
- RGB: 20W
- Total Estimated Draw: 775W
⚡ Step 2: Determine Recommended PSU Wattage
- Add 30% headroom: 775W × 1.3 = ~1000W
- Recommended PSU: 1000W (or 850W if you're confident in power spikes)
🏆 Step 3: Choose PSU Features
| Feature | Recommended Choice | Why? |
|---|---|---|
| Wattage | 1000W | Handles peak power draw with headroom |
| Efficiency | 80 PLUS Gold or Platinum | Better efficiency = less heat, lower electricity bills |
| Modularity | Fully Modular | Clean cable management for a high-end build |
| Form Factor | ATX | Standard for most full-tower cases |
| Brand | Corsair RM1000x, EVGA SuperNOVA 1000 G6, Seasonic PRIME 1000W | Reputable brands with good warranties |
| Protection Features | OVP, UVP, OCP, OPP, SCP, OTP | Full protection for expensive components |
| Fan Type | Fluid Dynamic Bearing (FDB) | Longer lifespan, quieter operation |
| Warranty | 7–10 Years | Peace of mind for a high-end build |
🔌 Step 4: Identify Required Connectors
| Component | Connector Needed | Quantity |
|---|---|---|
| Motherboard | 24-pin ATX | 1 |
| Motherboard (CPU Power) | 8-pin EPS (4+4) | 2 (i9-13900K may need dual 8-pin) |
| GPU (RTX 4080) | 12VHPWR or 3x 8-pin PCIe | 1 (12VHPWR) or 3 (8-pin) |
| Storage (NVMe SSD) | SATA or direct motherboard power | 1 (if using SATA SSD) |
| Storage (HDD) | SATA Power | 1 |
| AIO Liquid Cooler | SATA or Molex | 1 |
| Case Fans (x5) | SATA, Molex, or motherboard headers | 5 (or 1 if using a fan hub) |
| RGB Lighting | SATA or Molex | 1 |
⚠️ Note:
The RTX 4080 typically uses a 12VHPWR connector. If your PSU doesn't have one, you'll need an adapter (4x 8-pin PCIe to 12VHPWR).
🖼️ Step 5: Cable Management Plan
- Route the 24-pin ATX cable behind the motherboard tray.
- Use separate CPU power cables (if your PSU has dual 8-pin CPU connectors).
- Run GPU power cables along the side of the case (not across the motherboard).
- Bundle SATA and Molex cables together and route them along the case edges.
- Use Velcro straps to secure cables and improve airflow.
🔧 Troubleshooting Common PSU & Cabling Issues
🚨 Problem: System Won't Power On
| Possible Cause | How to Fix |
|---|---|
| PSU switch is off | Turn on the PSU switch (if it has one). |
| Loose connections | Re-seat all power connectors (24-pin, CPU, GPU). |
| Faulty power outlet | Try a different outlet or test with a known-good cable. |
| Faulty PSU | Test with a PSU tester or try another PSU. |
| Short circuit | Check for loose screws or metal touching the motherboard. |
| Motherboard issue | Test with a known-good PSU to rule out motherboard failure. |
🔄 Problem: Random Shutdowns/Restarts
| Possible Cause | How to Fix |
|---|---|
| Underpowered PSU | Upgrade to a higher-wattage PSU. |
| Overheating PSU | Ensure the PSU fan is spinning and not blocked. |
| Faulty PSU | Test with another PSU. |
| GPU power issues | Check that all PCIe connectors are properly seated. |
| CPU overheating | Check CPU cooler and thermal paste. |
🎭 Problem: GPU Not Detected or Artifacts
| Possible Cause | How to Fix |
|---|---|
| GPU not powered | Ensure all PCIe connectors are plugged in. |
| Insufficient PSU wattage | Upgrade to a higher-wattage PSU. |
| Faulty PCIe cable | Try a different PCIe cable from the PSU. |
| Driver issues | Reinstall GPU drivers. |
| GPU overheating | Check GPU fans and thermal paste. |
🔥 Problem: Burning Smell or Overheating
| Possible Cause | How to Fix |
|---|---|
| PSU overheating | Ensure proper airflow and clean dust from the PSU. |
| Faulty PSU | Stop using it immediately and replace it. |
| Short circuit | Check for loose cables or metal debris in the case. |
| Overloaded circuit | Avoid daisy-chaining PCIe connectors for high-power GPUs. |
⚠️ Emergency Steps if You Smell Burning:
- Turn off and unplug the PC immediately.
- Do not touch the PSU (capacitors may still be charged).
- Inspect for visible damage (burn marks, melted plastic).
- Replace the PSU if you suspect it's the cause.
🚀 Future Trends in PSU Technology
🔹 ATX12VO: The Next Standard
- What it is: A new standard where the PSU only provides +12V, and the motherboard handles DC-DC conversion for +5V and +3.3V.
- Benefits:
- Simplifies PSU design.
- Improves efficiency (less power loss in conversion).
- Reduces cable clutter (fewer rails).
- Adoption: Slow but growing; requires ATX12VO-compatible motherboards and PSUs.
🔹 Higher Efficiency (95%+)
- Current best: 80 PLUS Titanium (~94% efficiency).
- Future goal: 95–98% efficiency with new materials and designs.
- Impact: Even lower electricity bills and heat output.
🔹 Digital PSUs
- What it is: PSUs with microprocessor control, allowing:
- Software monitoring (power draw, voltage, temperature).
- Dynamic power delivery (adjusts based on system needs).
- Custom fan curves (for quieter operation).
- Examples: Corsair's iSeries (AXi, HXi, RMx) already offer digital monitoring.
🔹 Wireless Power Delivery (Experimental)
- Concept: No cables—power is delivered wirelessly to components.
- Challenges:
- Efficiency losses (wireless power is less efficient).
- Heat generation (wireless coils can get hot).
- Distance limitations (components must be close to the transmitter).
- Current Use: Mostly in laptops and smartphones (e.g., Qi wireless charging).
🔹 Liquid-Cooled PSUs
- What it is: PSUs with liquid cooling instead of air cooling.
- Benefits:
- Silent operation (no fan noise).
- Better for extreme overclocking (handles higher power draws).
- Examples: Some custom water-cooled builds use liquid-cooled PSUs.
📌 Conclusion: Choosing the Right PSU & Cabling for Your Build
The Power Supply Unit (PSU) is the unsung hero of your PC—it powers every component, and a poor choice can lead to instability, damage, or even fire. Meanwhile, proper cabling ensures reliable power delivery, good airflow, and a clean build.
🔹 Key Takeaways:
- Wattage Matters: Always choose a PSU with 20–30% more wattage than your system's estimated power draw.
- Efficiency = Savings: 80 PLUS Gold or Platinum PSUs save money and run cooler.
- Modularity = Cleanliness: Fully modular PSUs make cable management easier.
- Protection is Non-Negotiable: Only use PSUs with OVP, UVP, OCP, OPP, SCP, and OTP.
- Connector Knowledge is Power: Know which connectors your components need (24-pin, EPS, PCIe, SATA, etc.).
- Safety First: Never cheap out on a PSU, and always follow safety best practices.
🔹 Final Checklist for Buying a PSU
| Factor | Recommended Choice |
|---|---|
| Wattage | 20–30% more than your system's needs |
| Efficiency | 80 PLUS Gold or better |
| Form Factor | ATX (standard), SFX (small builds) |
| Modularity | Fully modular (best) or semi-modular |
| Brand | Corsair, EVGA, Seasonic, be quiet!, Thermaltake |
| Protection | OVP, UVP, OCP, OPP, SCP, OTP |
| Fan Type | Fluid Dynamic Bearing (FDB) |
| Warranty | 5–10 years |
| Price | $100–$250 (for most high-end builds) |
💡 Final Thoughts
A high-quality PSU is an investment in your system's longevity and reliability. While it might be tempting to save money on a cheap unit, a single power surge or failure can fry your entire build. Spend the extra money on a reputable, efficient, and well-protected PSU—your PC (and your wallet) will thank you in the long run.
📚 Additional Resources
- PSU Calculators:
- PSU Reviews & Tier Lists:
- Cable Management Guides:
💬 Discussion Questions
- Why is it important to have headroom when selecting a PSU wattage?
- What are the differences between 80 PLUS Bronze, Gold, and Platinum certifications?
- How would you troubleshoot a PC that turns on but doesn't display anything (possible PSU-related issue)?
- What are the advantages of a fully modular PSU over a non-modular one?
- Why should you avoid daisy-chaining PCIe connectors for high-end GPUs?
📌 Assignment
- Calculate the required PSU wattage for a PC with:
- AMD Ryzen 7 7800X3D (120W TDP)
- NVIDIA RTX 4070 (200W TDP)
- 32GB DDR5 RAM
- 1TB NVMe SSD + 2TB HDD
- 3x 120mm case fans
- AIO liquid cooler
- Draw a diagram of how you would connect all power cables in this build.
- Research and compare two PSUs (one 80 PLUS Gold, one 80 PLUS Platinum) in the 750W range. Which would you choose and why?
Test yourself on Computer Hardware And GSM Repaire
Basic Computer and Phone Troubleshooting Techniques Practice Test
Track your reading & take quizzes
Create free account